During this week the Design Team focused on building the frame for the Floating Car Project. Do to a backup with the 3-D printing, it was decided that Kinex pieces were the best alternative. The lab offers various sizes and types of Kinex pieces, thus allowing the Design Team to create a well suited car frame. The design of the frame was built in a manner that the balloons and CO2 cartridges can be maintained by the frame without dispersing and remain in contact with the device. The longer red Kinex pieces were used, instead of the yellow Kinex pieces to assure enough room when the balloons are fully inflated by the CO2 cartridges. Reinforcing structures were added on to the extremities of the frame in order to create a more solid structure. The balloons will be placed above the green Kinex pieces and tied together to the ends of the frame. With this kept in mind the CO2 cartridges will be placed above the car with all of the other sensory mechanisms.
 |
| Bottom View of the Frame |
 |
| Upper View of the Frame |
During week 8 the Design Team finalized their Design Proposal and submitted it for review. Within this proposal they spoke more about how the Relay switch will come to work in the mechanism.
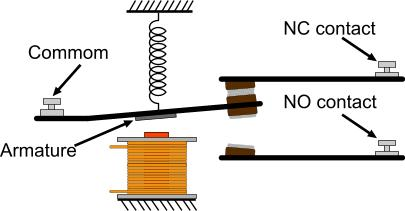
A relay switch will be activate when the water sensor reaches a certain value. The relay switch when activated will supply power to the solenoid valve, opening the valve and allowing CO2 to fill the balloons. Three components of Relay switch are Common, Normally closed and Normally open. For this circuit, common will be connected to the ground and NO, normally open, will be connected to the solenoid, a 12V battery will be used to power the solenoid. NC, normally closed, will remain unplugged since arduino will only activate relay if the water level is reached. A magnetic field is created when current is flown through the circuit which pulls the contact and changes its position, which enables the circuit.
 |
| Relay Switch Compatible With Arduino |
 |
| Function of a Relay Switch |


No comments:
Post a Comment